")
")
Note: Welcome to my Tip of the Week. If there is a tip I found, and I tested it, and it worked, I will share it. If you are just stopping by for the tip and not the story, scroll to the graphic at the end of the post.
It’s November and there I am, standing in my kitchen. Staring at my sauté pan. Wondering if exchanging diamond earrings for a pan was a good idea. I am unusually quiet. I am waiting for the pan to invite me into its life. Tell me its secrets. Make me the master chef I never wanted to be.
My beau is standing behind me. Respecting my quiet meeting with my pan.
When he proposed to me, he told me I was unlike any woman he had ever met. I think he is finding out how true that statement really is in this moment.
But, it’s just a pan. So the silence wanes on and on. I keep hearing the words from the sales lady, “Stainless steel pans are pretty hard to master. One day I am able to cook a perfect chicken breast in it. The next day, food is sticking and burnt.”
But it was just so pretty. All shiny. Just waiting to be used.
I think that trial and error might be best but this time, unlike others, I am not patient enough for that. I do some research online and find some tips.
If your food is sticking to your pan, it might be:
- too hot
- too cold
No one told me I was going to be reading a version of Goldilocks when I went on my search. Then again, Stout is standing in the kitchen with me and he looks just like a little bear.

Back to the pan. So, I am gathering it needs to be just right? And it hits me, I am Goldilocks and this pan is my porridge. Here’s to a fairytale ending.
The thing with stainless steel pans is, there are so many. Big, small, different metals…on and on. So there is no cookie cutter, “Heat for three minutes, no more and no less and you’re ready to rock and roll.”
It needs to be tested. You need to take the temperature of your pan. And here’s how.
TAKING THE TEMPERATURE OF YOUR PAN
First, I start with a little pep talk that goes something like this, “Listen, you beautiful shiny pot, I bought you and I am going to use you. And you are going to cooperate. And I am going to make lots of food in you and I will give you some of the credit. We’re a team ok? Let’s do this.”
And thus the experiment begins.
Turn your stove onto medium heat. If you are using stainless steel you definitely want medium heat or maybe a little less than medium high. Stainless steel does an excellent job at maintaining heat and even cooking. It’s what they’re known for. So if you crank your stove to high, your pan will get really hot really fast and it will be hard to bring it back down to a good cooking temperature.
As your pan is heating, you will be able to check it’s temperature every 30 seconds with a droplet of water. An 1/8 to be exact. Do not try to do this test with 1/4 teaspoon because that is too much water and this test will not work.
The first time you drop the water in, you might see this:
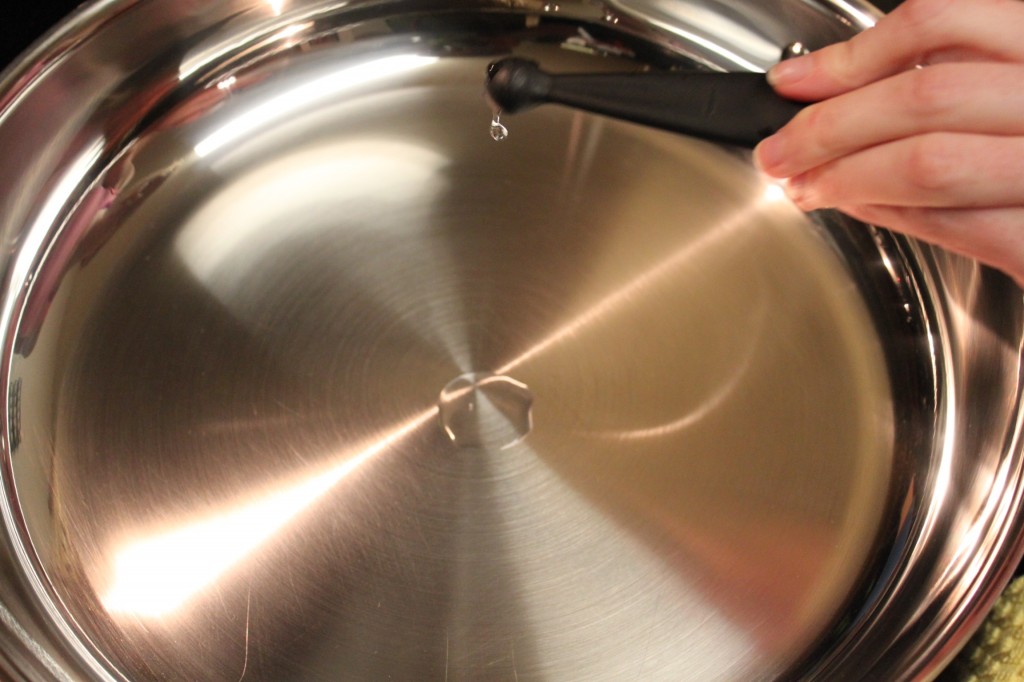
If the water does not react at all, that means the pan is still too cold and you need to let it warm up a little bit.
Wait about 30 to 45 seconds and try the test again.
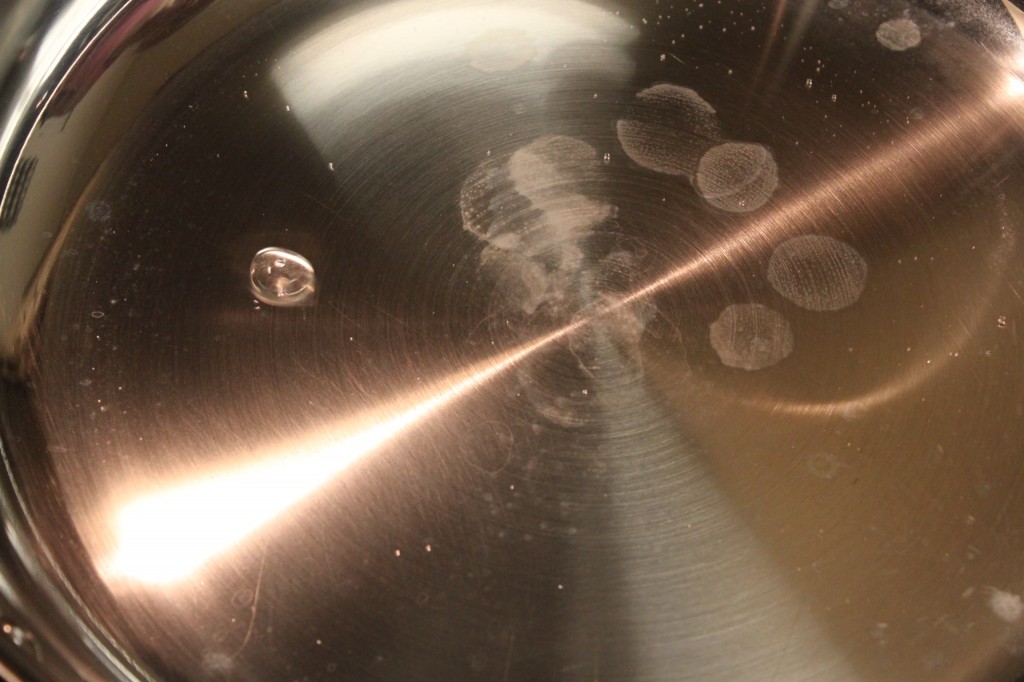
If you drop the water in and it bubbles and steams like the below picture, it is still too cold.

Again, wait another 30 to 45 seconds. Take a step back. Take a swig of water. Do some yoga poses to maintain peace.
You will probably experience this bubble effect one or two more times (like I did). This is no time to give up.
Jump a few times in the air like you’re in a boxing ring. That always helps. Take a second to mark off “exercise” from your to-do list.
Ask for a few shoulder rubs from your man or whoever happens to be nearby and step back into the ring.
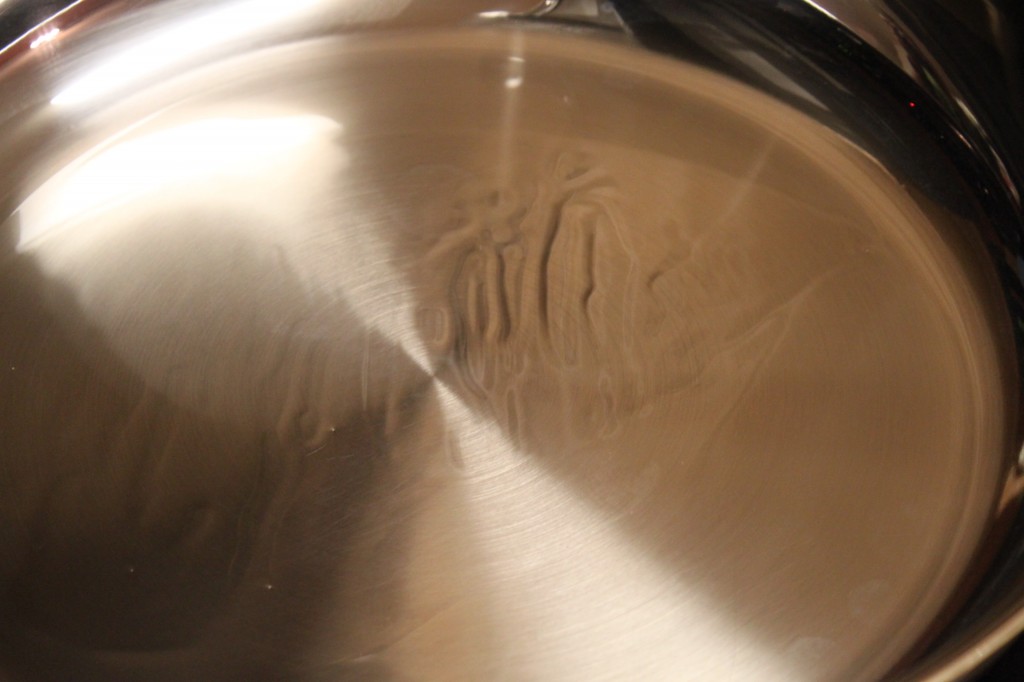
Next, you will probably see this:

These round bubbles are what you are looking for….well, the shape is what you are looking for. But you need to see one, large ball of water glide along the pan to know your pan is ready.
Time for a little lesson.
Stainless steel pans have pores in them and when heated these pores open and close during the heating process. If your pan is not heated properly and you put your chicken (or what have you) in the pan, the opening and closing pores will latch onto your food, causing it to stick when you go to flip it.
When the pan is at the right temperature, the pores are no longer opening and closing. This is why the water test is perfect. When water hits a pan and forms one perfect ball that glides across the pan, the pores are stable. Your pan is heated.
This is the one perfect ball of water you are looking for:

Look near the middle to the right-hand side and you will see the ball I am mentioning.
Here is another close-up:
Obviously at this point I want to do an elaborate, choreographed dance in celebration of properly heating my pan BUT, THERE IS NO TIME FOR THAT.
Maintain composure. Push those feelings of joy to the side, temporarily. (I am not all about suppressing emotions, as my beau can attest to.)
Seeing as the pan is at the EXACT right temperature, you have to act quickly because the pan is still on the heat source and still climbing in temperature. Have your oil by your pan and add it quickly. It is also good to have your food ready to be put in your pan.
When you add anything to a pan, it lowers the temperature. Adding the oil will result in a slight decrease in temperature but only for a few seconds. You will know your oil is properly heated when you see the very first whisp of smoke. Or, if you move the oil around and you see legs form (the kind of legs you see when you swirl a glass of wine).
Once you see this it is time to immediately add your food!
I want to go big or go home. So I choose fish instead of chicken for this experiment. I have never been able to cook fish in a stainless steel pan without it sticking.
In they go. After 4 minutes it is time to flip them. My sweaty palms grab the spatula. It is a moment of truth for me:
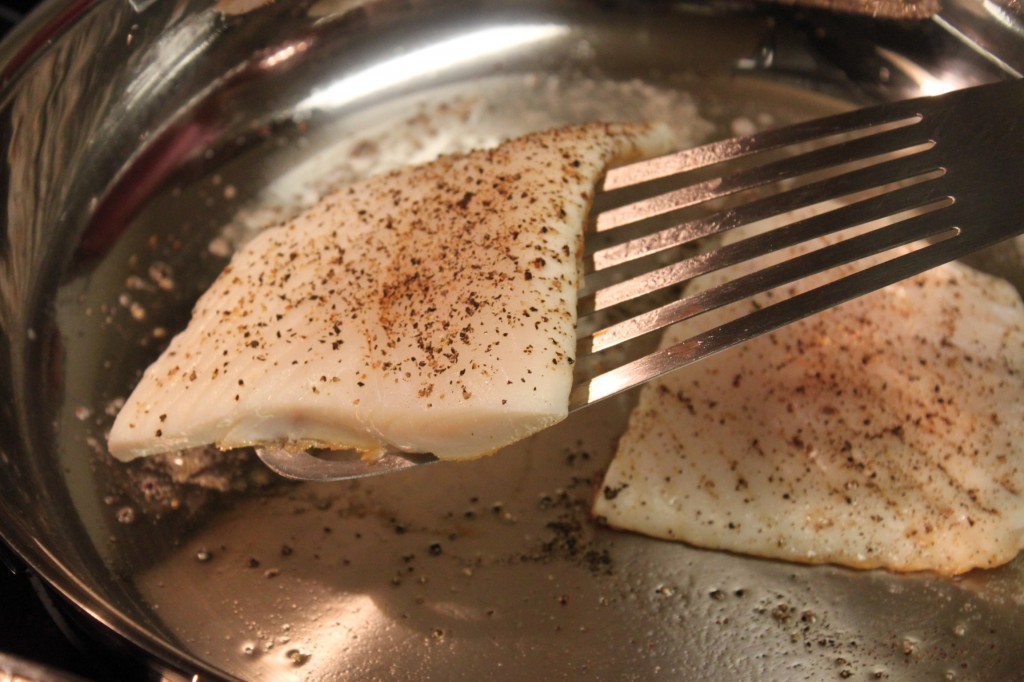
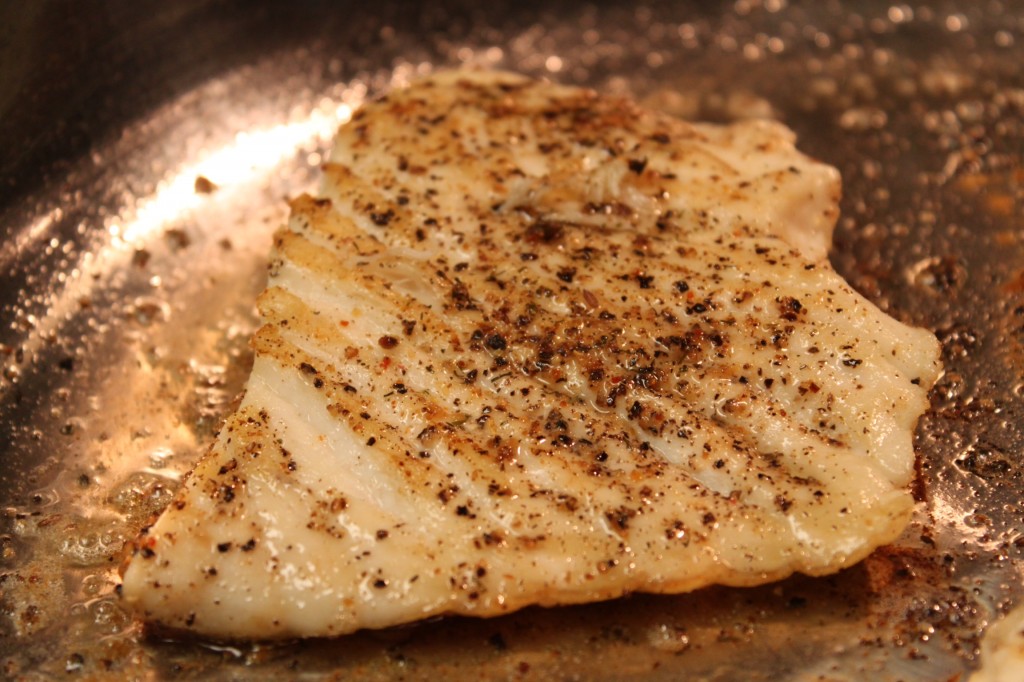
And up she comes. Perfect execution. No fish stuck to my pan!!!
And that is how you properly heat your pan. I have done this water experiment the first several times I used my pan. After repetition you begin to learn the exact time it takes for your pan to heat properly. Then you become a seasoned pro and you do not need the water experiment anymore.
Basically, you’re ready to compete on The Next Iron Chef.
A Note About Stainless Steel Pans
I did not only pick a Tri-Ply stainless steel pan over a non-stick pan because some lady was not confident in my ability to master it. I did it for the following reasons:
- When I thought about the kitchens of my favorite restaurants or my favorite celebrity chefs I recalled that they all used stainless steel pans. There must be a reason…
- I am a huge fan of my meat being all browned perfectly with a gorgeous crust and I have never been able to create that in a non-stick pan.
- I LOVE making reductions. (In cooking, reduction is the process of thickening and intensifying the flavor of a liquid mixture such as a soup or sauce.) In many of the recipes I use, they utilize the little brown bits (also called fonds) leftover in a pan after frying to make a rich sauce. BUT, these beautiful brown bits are not able to be created in a non-stick pan…because nothing can stick.
And that is why I went with stainless steel!
And now, for the cliff notes:

Any questions?!
I do something like this when I make pancakes. I’ll get a light amount of water on my fingers and flick it in to the pan or griddle. If it makes the right sizzle I know the pan is ready otherwise the pancakes will either stick or cook too fast. Great tip Bri.
Thank you so much for this post and for including pics! I’m trying to make the switch from non-stick and well…everything’s sticking 😉 Just wanted to let you know how much I appreciated your post. Cheers
Thanks so much, Elisa! So glad you enjoyed the post! You are going to get there 🙂
Reading this post gave me the confidence I needed to cook me wife and I Salmon and Eggs in our new SS pans. Thanks to you the result was beautiful! No sticking!
Just tried it, brilliant!
Awesome article! I just purchased my first 10″ SS pan after wanting one for so long (student budget) and this gave me new insights! Thank you so much. I look forward to reading more.
Thank you so much! I wanted to buy SS pans but was never confident in terms of not getting food all sticky to the sides. Today I’m heading out to buy a set!
Recently my sister has given up on her SS pots, so I gladly took them (student budget as well). Is there a proper way to clean SS pots? Also everything I have cooked thus far has stuck to the pan, but I will try this now before I cook my next meal. Thanks for the tip, and any more that may come of this post.
Hi Carlos! I am excited about the journey you are about to embark on with your SS pots. Do not clean them in the dishwasher. That will tarnish, scratch and potentially rust them over time. We use a mild dish detergent with a nonabrasive sponge. There are sponges out there that say on the label “nonabrasive” or “good for stainless steel.” Once we wash it we dry it immediately. Hope that helps!
Never use anything abrasive! Recommend by salesman I bought my SS pan set. Use Barkeepers Friend cleaner. It is not abrasive like Comet or Ajax. It will Orkney like a charm and restore the luster of your pan. Only need plastic sponge.
I use ss pan that I found thrown out by the garbage bin near our apartment. Greasy and dirty like hell. Ever since then I clean it just by rubbing it with sand and giving it a good rinse.
I am not worried about scratches as my pan works as well as my mothers eighty dollar super polished shiny pan.
No sticking at all when I use the right temperature as mentioned in this article.
Loved this post! It’s funny how you can develop a very special relationship with cookware, isn’t it?! Have just bought a SS pan and wasn’t quite sure how to get best results from it – so thanks for the tips. 🙂
I got my first ss pan today and cooked fajitas tonite! You are so cute and I like your humor:-) I too have bangs, a beau and a stout of sorts. Thanks!
Lisa! We sound like kindred spirits 🙂 Thanks so much for dropping by and leaving such encouragement! May you have many wonderful meals cooked in your new ss pan.
i cook only in pure clay cookware (not ceramic) there are a whole line of unglazed pots and pans made from natural clay. once seasoned the pots become naturally non-stick. its very easy to cook in them too, a little different but certainly not as hard as it is to cook with metals. the pots don’t need any baby sitting . i got mine from Miriamsearthencookware.com
Love the tips and pictures on this post! I have only non-stick pans and one enamel cast iron dutch oven… I am definitely looking into getting one stainless steel pan for better meat sear! I’d love to see how my food turns out using this method instead of my other pans!
Hey so is it bad that I had to use a Brillo pad to take off some stains and build up? Will the water trick still work on the pan
Hey Neil, it is always advised not to use a brillo pad on stainless steel. It can scratch up the metal and wear it down over time making the pan less effective. I am not sure if the water trick will still work? If you have only used the brillo pad once and do not see too much damage to your pan then I would think it is ok 🙂 In the future, for stains and build up I use Bar Keepers Friend Soft Cleanser for stainless steel. It seriously makes your pans look brand new. And you can use a soft cloth and warm water to get everything off! It’s brilliant and does zero harm!
Will this work when I use my Ne-wave Induction burner? I use my stainless steel equipment on it all the time which I have to. Should I start them out on low/medium heat. I have always start out on medium hight and food sticks all the time.
Jim
I had the same questions about stainless steel pans for soooo long. I think this tip changed my life. Seriously…life…changed 🙂
Andy – you nailed it! Same for me. Life. Changed!
Thank you. This was SO helpful!!!
Thank you so much for this! Last night I was almost in tears trying to get the scrambled eggs out of my brand new super-duper ss skillet. I was beginning to regret dropping an entire paycheck on some pans, but lately, I have been feeling that I need to get away from my college-era teflon and into some grown-up cookware. I am also, like you, blessed with a very patient and understanding husband who agreed that it was time to switch and encouraged me to study it a little bit, then try again. So with renewed courage and fresh enthusiasm, I will make another attempt tonight, this time with a nice piece of meat and a pre-heated drop of water.
Thank you!!!!!!!!! And your puppy is Adorable :))
Hi there I love this post. I just bought a stainless steel pan and your post is definitely what I needed. I have a question though. You didn’t season your pan before this water test did you? I read some people do season it and I am wondering if you have actually done it before the water blob test. Thank you!
Hi Kelly! So excited for you and your purchase! To answer your question, no I do not season my SS pans. I do season my cast iron skillet but that is the only one!
I’ve recently bought an induction hob and a shiny new stainless steel frying pan. I’ve watched videos on YouTube and read tutorials on line, but still I managed to have my omelette stick to the pan.
After reading this tutorial I tried the water test thing and my omelette came out fine! There was just a tiny bit of sticking, but mostly it was fine. I was happy and relieved as I thought I had bitten off more than I could chew with stainless steel frying. Another thing I learned was that if the omelette was stuck to the pan in the beginning, it loosens later on.
This tutorial has been invaluable. Thank you!
Ella! Your comment made my day! I am so grateful this little post could help you. Excited for your new hob and frying pan. I am sure many great meals will come from it 🙂
how much oil do you add to the pan once it reaches the right temperature?
Hi Bri stumbled upon this and though many articles have explained how to get the perfect temp, yours is the most clear 🙂 but now i want to ask if i need to lower the temp/heat AFTER i add my meat or vegs or maintain the same heat till my meat cooks through? or it depends? just learning how to cook tnx
Grace! I am so glad this helps. I constantly am monitoring the temperature. Usually after a bit of cooking time I need to lower the heat a bit.
I moved to a dorm and they only provide me with stainless steel pans. I was so sick of scratching burns off my pans. This is a lifesaver!
Wow. Nice piece. You might be overly wordy and dramatic for some, but perfect for me. Loved your articulation and attention to personal giddiness on getting it right. This was a great article.
How do you do the test for making candy
WOW. It worked like a charm. Thanks.
Even I can do fish. The real test is pancakes!
Thank you, thank you, thank you!! I was following an America’s Test Kitchen recipe for Parmesan crusted chicken cutlets, but they insisted it could only be accomplished using nonstick pans. With your guideance, I knocked that recipe out of the park with my stainless pan! 🙂
Meredith! This is such great news!! I am so grateful this worked for you. That meal sounds yummy 🙂
I loved this. You are so creative yet very informative. You are such a joy and brightened my day.
Such a good tip on this “stainless steel vs. nonstick” dilemna!!!”
Just wondering why use use vegetable oil rather than butter for fried eggs? Wouldn’t butter make the eggs taste better? Thanks.
They look so happy.. wonderful!
Thanks for sharing nice information with us…
Great. I like it!
Thank you so much for this post! For the first time since I got my stainless steel pans, I cooked perfect chicken–no sticking!
I am so glad, Kali! Cook on. xoxo
thank you for sharing
I just learned today that you can actually season a stainless steel pan with coconut oil to create a naturally occurring non-stick surface, similar to how you would season cast iron. I will be trying it out this evening for myself.
That is awesome information, Camille! I hope it works out and please report back about how it went 🙂
This is awesome! Can you get the pan too hot though?
Thanks from SF. I’m on my 2nd set of stainless cookware. Thought the problems with the first were because it was only 2 ply. But then encountered sticking with the new 3 ply, even after preheating. Your instructions worked perfectly. My omelet did not stick at all! Thank you so much.
I am so grateful!! Here is to many delicious recipes cooked in your stainless steel pan!
Thank you, very helpful!
SO HELPFUL!!!!!!!!!!!!
You must heat the pan slowly on med or med low. Then add oil. let the oil glimmer so you can see your face. Then add food.
Wait. It will release. This is a slower method of cooking. You must be patient. If you are in a hurry, order take out. Todd cooked in ss tastes much better.
Thank you. Very helpfull indeed!
Funnily, ‘stout’ means naughty or cheeky in Dutch, not sure if that fits your dog Stout. He’s so cute. Wouldn’t believe that he’s ever anything but adorable.
I bought a SS pan mainly for bacon and eggs on weekends. I thought you could season the pan with oil before use,but I have had bacon stick like glue in spite of seasoning. Besides following your excellent advice,can you suggest anything else I might do to prevent bacon sticking? I was using a seasoned CI pan before the SS one.
Thanks Bri-
I spent an hour deciding which pan to buy and finally relinquished on the all clad stainless steel. I thought I would pass out at the price, especially in comparison to the others hanging.
But good stainless steel is becoming my all favorite, go to for everything.
you’re so cool! I love how you show your personality through your writing. I am now a subscriber to your blog.
signed
– nervous newly wed wifey
What a lovely comment! Thank you so much, Khristy. I am so grateful to have you follow along. So much joy!
Awesome tip! Cant wait to try it at home. I’ve been hesitant to buy a stainless steel wok, but now with this experiment and when i try it i’m confident i’ll be able to cook different dishes on stainless. Thank you so much for this great blog post!!!
Worked well… U are a genius!
I am so grateful!
Didn’t work for me. I had a successful water test, got my oil to the point where it had “legs” and yet approximately half of the hash browns I put in are still caked onto the pan. I reluctantly did my over-easy eggs in the small sliver of pan that wasn’t caked in burned potatoes. What a massacre. Thank goodness it was for my own breakfast and I wasn’t going for presentation.
I was really hoping this trick would work, since I also have the problem of stuff sticking to my SS pans. I dropped an 1/8 a tsp of water on my pan every 45 seconds for 10 minutes with the heat at 4. It never formed a ball and always immediately boiled off. The pan I was using is an older Cuisinart, so maybe that’s the issue, and I didn’t season it (I didn’t know you were supposed to when I got it), but it is one of the highest rated SS pans on Amazon with over 600 reviews and 4.5 star rating.
Pretty sure “4” is not hot enough… Her article suggests medium or even a little less than medium-high.
Great post with great pictures, so helpful for so many of us! I started cooking on SS in the 60’s on RevereWare, which was single ply SS with copper bottoms. There was a lot of sticking, and warping, on those pans! Fast forward to today, I still cook on SS, but now use heavy gauge 3 ply pans and there is a world of difference! Not all SS is created equal and some brands preform better than others. (I still believe some things are better cooked in other pans, for instance my favorite pan for pancakes or fried eggs is still cast iron.) Your post reminded me to follow proper heating of my pans as I can sometimes rush the process.
I had long given up cooking on the dreaded stainless steel pan as it always stuck food. After reading your amazing article I thought I would try to make amends with my nemesis after many years of isolation. I cleaned it up with Bar Keepers Friend with a lot of elbow grease and she looked almost new, with only a few scars from past battles. I said this was a new beginning for us and asked forgiveness for our past misunderstandings, then with bated breath, turn the gas on. Followed your advise and guessed the pan temperature perfectly as the ball of water skated across the pan surface as you described. Added the oil and waited for the ribbons to show, and then added my pork chops. As the timer reached 3 minutes, the moment of truth raised… I grabbed my tongs and effortlessly flipped the perfectly golden browned chops with glee! Finally we were working as one, in unison for the first time. Can’t possibly thank you enough for making our relationship all I hoped it would be.
You rock!
I could not be cheering more loudly for you! I am so incredibly grateful you gave this a shot and are back in a healthy relationship with your SS pan. Thank you so much for taking the time to comment and for the encouragement!
Hi! Does your tip also work for fried eggs that would slide right out of the pan? That’s my test.
Yes! Even for fried eggs. I have done it and it works every time. The key is to heat the pan appropriately just like it is detailed above.
Thank you so much for this post, I can’t wait to try this! Just cleaned up my 10 inch stainless steel skillet with Kleen King (great cleanser!) and will try this next time! I have not used that pan in SO long because everything sticks. User error! Thanks again.